

SSD车辆与车牌模型部署
编译环境:Visual Studio 2017 + openvino2023 + opencv4.8
模型:vehicle-license-plate-detection-barrier-0106
>模型介绍
vehicle-license-plate-detection-barrier-0106
MobileNetV2 + SSD-based vehicle and (Chinese) license plate detector
基于BIT-Vehicle数据集
输入 1x3x300x300 = NHWC,BGR
输出格式[1,1,N,7] = 1x1x200x7
七个值:[image_id, label, conf, x_min, y_min, x_max, y_max]
1.完整代码
#include"config.h"
#include"label_read.h"
#include"common.h"
int main(int argc, char** argv) {
cv::Mat image = cv::imread(IMG_FILE "car_test.png");
int ih = image.rows;
int iw = image.cols;
ov::Core core;
vector<string> avaliableDevices = core.get_available_devices();
for (int i = 0; i < avaliableDevices.size(); i++) {
printf("supported device name: %s\n", avaliableDevices[i].c_str());
}
// set input data format and layout
std::string model_xml = MODEL_FILE "vehicle-license-plate-detection-barrier-0106/FP32/vehicle-license-plate-detection-barrier-0106.xml";
auto model = core.read_model(model_xml);
ov::preprocess::PrePostProcessor ppp(model);
ov::preprocess::InputInfo& inputInfo = ppp.input();
inputInfo.tensor().set_element_type(ov::element::u8);
inputInfo.tensor().set_layout({ "NHWC" });
// apply changes and get compiled model
model = ppp.build();
ov::CompiledModel cmodel = core.compile_model(model,"GPU");
// create infer request
auto request = cmodel.create_infer_request();
// set input image
ov::Shape input_shape = request.get_input_tensor().get_shape();
size_t h = input_shape[1];
size_t w = input_shape[2];
size_t ch = input_shape[3];
std::cout << "NHWC: " << input_shape[0] << "x" << h << "x" << w << "x" << ch << std::endl;
cv::Mat blob;
cv::resize(image, blob, cv::Size(w, h));
// put image data into tensor
auto allocator = std::make_shared<SharedTensorAllocator>(blob);
auto input_tensor = ov::Tensor(ov::element::u8, ov::Shape{ 1, h, w, ch }, ov::Allocator(allocator));
request.set_input_tensor(input_tensor);
// inference
request.infer();
// output
ov::Tensor output = request.get_output_tensor();
size_t num = output.get_shape()[2];
size_t cnum = output.get_shape()[3];
std::cout << num << "x" << cnum << endl;
Mat prob(num, cnum, CV_32F, (float*)output.data());
for (int i = 0; i < num; i++) {
float conf = prob.at<float>(i, 2);
if (conf > 0.75) {
int x_min = static_cast<int>(prob.at<float>(i, 3)*iw);
int y_min = static_cast<int>(prob.at<float>(i, 4)*ih);
int x_max = static_cast<int>(prob.at<float>(i, 5)*iw);
int y_max = static_cast<int>(prob.at<float>(i, 6)*ih);
cv::rectangle(image, cv::Rect(x_min, y_min, x_max - x_min, y_max - y_min), Scalar(0, 0, 255), 2, 8, 0);
}
}
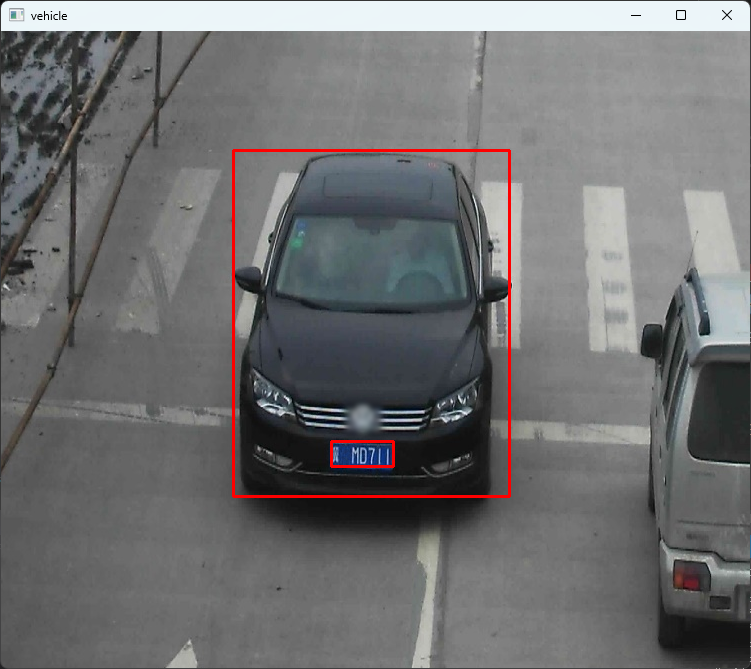
cv::imshow("vehicle", image);
cv::waitKey(0);
// pose process
return 0;
}2.代码解析
(1)模型的部署与推理
头文件可以从我的github获取
cv::Mat image = cv::imread(IMG_FILE "car_test.png");
int ih = image.rows;
int iw = image.cols;
首先加载图像并获取宽高
ov::Core core;
vector<string> avaliableDevices = core.get_available_devices();
创建一个ov::Core对象,这是openvino用于模型管理和推理的接口,然后获取系统中支持的所有设备名称并储存在avaliableDevices中
auto model = core.read_model(model_xml);
ov::preprocess::PrePostProcessor ppp(model);
读取模型并存储到ov::Model对象中,然后创建一个ov::preprocess::PrePostProcessor对象用于对模型的输入和输出进行预处理和后处理
ov::preprocess::InputInfo& inputInfo = ppp.input();
inputInfo.tensor().set_element_type(ov::element::u8);
inputInfo.tensor().set_layout({ "NHWC" });
获取模型的输入信息,存储到ov::preprocess::InputInfo&对象 inputInfo中
设置输入张量的元素类型为ov::element::u8(8位无符号整数)
设置输入张量的布局为NHWC
model = ppp.build();
ov::CompiledModel cmodel = core.compile_model(model,"GPU");
构建更新后的模型,进行编译,指定使用GPU进行推理,并将编译后的模型存储在ov::CompiledModel对象cmodel中
auto request = cmodel.create_infer_request();从编译好的模型中创建一个推理请求对象request,用于执行模型的推理操作
ov::Shape input_shape = request.get_input_tensor().get_shape();
cv::Mat blob;
cv::resize(image, blob, cv::Size(w, h));
获取模型输入张量的形状信息,并根据输入图像大小与模型输入张量形状匹配
auto allocator = std::make_shared<SharedTensorAllocator>(blob);
auto input_tensor = ov::Tensor(ov::element::u8, ov::Shape{ 1, h, w, ch }, ov::Allocator(allocator));
request.set_input_tensor(input_tensor);
将图像数据放入到张量input_tensor中,然后将输入张量input_tensor设置到推理请求requset中
request.infer();执行推理
(2)模型的后处理
ov::Tensor output = request.get_output_tensor();获取输出张量,这个输出张良中包含了模型推理的结果
Mat prob(num, cnum, CV_32F, (float*)output.data());将输出张量转化为cv::Mat对象,便于进一步处理
	for (int i = 0; i < num; i++) {
		float conf = prob.at<float>(i, 2);
		if (conf > 0.75) {
			int x_min = static_cast<int>(prob.at<float>(i, 3)*iw);
			int y_min = static_cast<int>(prob.at<float>(i, 4)*ih);
			int x_max = static_cast<int>(prob.at<float>(i, 5)*iw);
			int y_max = static_cast<int>(prob.at<float>(i, 6)*ih);
			cv::rectangle(image, cv::Rect(x_min, y_min, x_max - x_min, y_max - y_min), Scalar(0, 0, 255), 2, 8, 0);
		}
	}
遍历图像获取置信度,并根据条件判断如果置信度大于阈值则绘制检测结果
3.效果展示

written by johan